Showing posts with label Paper Crafting. Show all posts

Friday, May 31, 2013

Paper Flower Graduation Lei

Tonight my niece is graduating from high school.  Since we are not celebrating her graduation with a party until later in June I wanted to make and give her a little something special.  I'm planning to surprise her with this Paper Graduation Lei, made in her school colors, right after her graduation ceremony when friends and family are all able to go down on the Football field to spend a little time with the graduates before they jet off to their all-night Sober Grad celebration.  I didn't want to spend a bundle on a gift since we will be giving her a little something more at her graduation party in a few weeks, but I also wanted to do something unique and special for her that would stand out among the other grads.  I thought this would be something fun she could wear at her Sober Grad Party and something she could keep as a keepsake of her graduation night.  I had searched Pinterest for ideas and I found several flower leis or candy leis, but those seem to be fairly popular.  I wanted something different.  Since I'm a paper crafter, who loves nothing more than to craft with paper, I started thinking about things I could do with my paper supplies and tools.  That is how I came up with this Paper Flower Lei.

I posted a photo of it on my personal Facebook page and a scrapbook message board I frequent and several friends asked me for the how-to instructions so I decided to write up this quick and simple tutorial.  It really is a super easy craft and if you have all the supplies ready you can whip one out in no time.

Here is what you will need:

At least 2 sheets of 12"x12"  thick cardstock in at least two coordinating colors (I chose black and gold glitter cardstock since my niece's school colors are black and gold)  You will want to use the thick cardstock so that the lei holds up well.  Thinner printed scrapbook paper will not work well for this project since it is something that is going to be worn.

coordinating colored brads (one for each layered blossom)

An electric craft cutter - such as a Silhouette Cameo (that is what I used) or a Cricut and a flower shaped cutting file of your choice, or a flower shaped cutting die that has at least two different sized blossoms and a Big Shot (or similar die cutting machine).

A "Class of 2013" cutting file or similar image (I got my "Class of 2013" file and my blossom file from Silhouette Studios Online Store).  You can also use a die cut, you can make your own, choose a saying or image that fits your occasion or eliminate it all together and use more blossoms.

o rings (I used these 10mm sized rings from Darice)

a small hole punch (just large enough to cut a hole big enough for your jump rings)

paper piercer, Crop-A-Dile Big Bite, or other long reaching small hole punch (or do what I did add the small circle in the center of the flower cutting file and allow your electronic cutter to do the work)

small pliers (to close the o rings)


Directions:

Using your cutting machine of choice cut out 11 large blossoms in your first color.  Then cut out 10 large blossoms in your second color.  Repeat for the smaller size blossoms, 11 of your first color and 10 of your second color.  My larger blossom measured about 2 1/2" and my smaller blossom was about 2" in size.  You can customize yours to fit your needs, but realize you may need more or less blossoms to make the lei your preferred length.

Punch or pierce a small hole in to the center of each blossom.

Using your fingers or a smooth barreled pen roll the petal on each blossom toward the center to give it some dimension. 

Layer a small blossom on top of a large blossom and secure with a brad to hold them together.  Make sure you alternate colors of your small blossom and large blossom so that they are two toned.

Next punch two small holes in the petals of your larger blossom.  Punch one on one petal and then the second on a petal closest to the opposite side of the first hole.

If you are using a "Class of 2013" die cut or similar type image, punch a hole in each side of the die cut and attach an o ring in each hole and then attach a blossom on the o ring on each side before securing them closed with pliers.  Next attach a second o ring to each blossom and again attach a blossom to each side before securing each o ring closed.  Be sure to alternate blossom colors as you go.  Once your lei is the length you like, close the circle by securing the final two blossoms together with an o ring.

There you have it, your very own Paper Flower Lei to give to someone special on their graduation day.

These would make the perfect fun accessory for any number of occasions.  Imagine the bride and bridal party wearing them at a bachelorette party or bridal shower, or the new mommy-to-be wearing one at her baby shower.  Really these would be fun to make and wear for any special party occasion.

Thursday, November 01, 2012

Mini Soda Pumpkin Halloween Treats

I realize this post comes a day late, but maybe it will give you an idea to use for Halloween next year.  I would have loved to post this prior to Halloween, but I didn't get to working on these until just a day or two before the holiday.  Then preparing for our trick-or-treaters (we usually get 700-750 of them) took over my time and I didn't get the chance to post this project before the thirty-first.

We have a few kids who live on our block and my husband and I wanted to give them each an extra special treat this Halloween.  We were looking around Target one day trying to come up with an idea of what we wanted to hand out to these special kids and we came across mini soda cans.  We both thought they would be an unexpected sweet treat and each of the sodas we picked were caffeine free, so we figured even though we would be giving a sugary drink we would be adding to their Halloween candy buzz with the addition of a caffeine filled one.  Being the crafter that I am I began thinking of ways I could dress up these little cans.  That is where, Pinterest, my favorite site for creative inspiration came in to play.  I immediately came home and started searching Pinterest to see if I could find ideas for how to wrap these little babies.  VoilĂ , I found this cute idea for wrapping cans to look like goofy little pumpkins that was pinned from the blog Craft Goodies.

If you want to make mini wrapped soda cans for your own little ghosts and goblins here is what you will need:


  • Mini Soda Cans (8 oz. cans)
  • Orange Patterned Cardstock of your choice, cut to 8.75" x 2.5" for each soda can
  • Black Cardstock, for the eyes
  • White Cardstock, for the eyes
  • Green Cardstock, for the leaf
  • Brown or Tan Cardstock, for the stem
  • Cardstock of your choice, for the name tag
  • 1" Round Punch
  • 1 1/2" Round Punch
  • 1 1/2" Square Punch, or cut squares to 1 1/2" for the stem
  • Leaf Punch (I used Stampin' Up's Blossom Petals Xl Punch)
  • Craft Scissors
  • Black Pen
  • White Pen
  • Terrifically Tacky Tape or Scor-Tape
  • Permanent Adhesive (I prefer the Tombo Mono Adhesive permanent adhesive tape runner)
  • Round Scallop Punch or Oval Scallop Punch, for the name tag
  • Hole Punch
  • Ribbon
Directions:

Cut your orange paper down to size to fit your soda can.  For the mini 8 oz. cans I used a paper cut to 8.75" long by 2.5" wide.  Apply Tacky Tape or Scor-Tape to the back side of the paper  on each end width-wise going from edge to edge.  Remove the backing from the adhesive on one end of your paper and attach it to the can carefully lining up the paper with the edges of the can (once that adhesive is stuck, it is STUCK), then wrap the paper around the can snugly, remove the paper backing covering the adhesive on the other end and adhere it to the can.  The paper will overlap a bit at the seam.  Next you will cut out a 1 1/2" square from your brown or tan cardstock and then using scissors trim away a bit of the paper on each side to make the shape for the stem.  Using your black pen outline the stem and then add a few lines to the stem to accent it to look like bark.  Use Tacky Tape or Scor-Tape to attach the stem to the can.  Now punch out a leaf using your leaf punch and then outline and accent it with black ink.  Attach the leaf to the can using your permanent adhesive.  Then punch out two black 1" circles and two white 1 1/2" circles for the eyes.  Using your white pen add a little accent mark to each of the black circles.  Using your black marker, make small "stitch" marks all the way around each white circle.  Using your permanent adhesive attach one black circle to each white circle.  There you have your eyes!  Attach your eyes to the can with a small bit of Tacky Tape or Scor-Tape.  Using your black pen draw the mouth of your choice onto the orange paper and add small accent marks or dots aroud the eyes to give your little pumpkin some character.  If you want to add a name tag to your can you can punch out a round scallop or an oval scallop shape and then punch a hole on one end with a hole punch.  Add the name of your choice.  Cut a piece of ribbon about 6" in length and then slip one end under the tab of the soda can.  Attach your name tag to the ribbon and tie off in a knot.  Trim the edges of your ribbon if it is a bit too long.  There you have it!

If you have some little ones who are still a bit too young for candy and soda you can also apply this idea to other treats more suitable for their age.  We have one little guy in our neighborhood who just turned 1 year old a few months ago, so I decided to give him a Gerber Graduates instead of soda.


The directions above for the mini cans also pretty much apply to the Gerber Graduates containers, but because the Gerber Graduates are a bit soft and squishy I found it easier to make the orange paper just a tad wider than the container and wrap the paper around it vertically rather than horizontally.  I believe my paper was 12" in length by about 5" wide.  Attach the paper to the container using Tacky Tape or Scor-Tape and decorate according to the directions above.

Now next year you can enjoy giving your favorite trick-or-treater an extra special Halloween treat.

Shared on:

Skip To My Lou


 Katie's Nesting Spot

Thursday, October 06, 2011

Paper Crafting: Lil' Paper Pumpkins

I absolutely love Autumn.  It is without a doubt my favorite season.  I love everything about this time of the year: the sites; the sounds; the smells; the changing colors of the leaves on the trees; the fact that we are approaching the Christmas season, my other favorite time of year.  It seems like I awaken and become more energetic as cooler, crisp Autumn days approach.  Since August I have been pinning for cooler weather and the chance to have an excuse to put out some of my Autumn decorations.

This week I met with my little group of handmade card making friends for our monthly get-together.  Each month we have a theme and we each present and teach the others in the group how to make a card in that theme.  This month our theme was Fall or Holiday and we could make either a card or a little project that would take the same amount of time as a card.  Sometimes I am bad about waiting until the last minute to decide what I'm going to make and present to my group.  This month was no different, but I knew I had the desire to present something other than a card.  The night before card group I found myself search Google and Pinterest for project ideas.

NOTE: If you haven't heard of Pinterest check it out!  It's the most amazing little website filled with all kinds of cool, unique and beautiful things found on the Internet.  Basically you create your own virtual pin boards where you can pin the photos and links to all the cool ideas, awesome products, fabulous crafts, or delicious recipes you find on the big ol' web and keep them all easily in one place, plus you can  peak in on other people, follow them, and repin their great finds onto your boards.  Seriously, you will fall in love!

Anyway, back to my point.  In searching for ideas I came across this fabulous blog, Stamp-n-Design with Lynn Pratt and I came across the tutorial for these cute lil paper pumpkins.   They looked quick and easy to make and they are super cute so I decided to whip those up for my cardmaking group project.  In making mine i did end up using a few less strips of paper.  I chose to use 12 strips rather than the 16 that Lynn's tutorial suggested.  I tried it with the 16 first and it was just a bit too difficult for me to get my chubby little fingers between the layers to separate all of them.  I also decided to alter my paper design between a pattern and a solid and I added a Stampin' Up scallop circle to the top to hide the strips before tying the ribbon off.   Then I finished off by adhering two "leaves" punched from my Stampin' Up Blossom Petals Builder punch.

I absolutely loved how easy these were to make, and I can just imagine the possibilities using different patterns of paper and different lengths of paper.

I used mine as part of my Autumn mantel decor.  What do you think?


What season inspires you?  What do you love most about Autumn?  I would love to hear from you.

Sunday, September 26, 2010

Sunday Stampin' - Altered Plastic Vegetable/Fruit Clam Shell Box

Recently on the scrapbook message board I frequent a member posted a link to a blog, Kerry's Paper Crafting Blog, with the idea for altering plastic clam shell fruit boxes to be used as gift containers.  

You know the type.  Often times you will find grapes, strawberries, cherry tomatoes, or other easily damaged fruit packaged in them at the grocery store.  We probably all currently have or have had them in our refrigerator at one time or another and ended up trashing them in the garbage can after they were empty.

I know I have trashed countless numbers of these plastic containers in the past.  Well, after seeing this altering idea I am going to be thinking twice before I throw away anymore plastic fruit boxes.

Recently, while at my father-in-law's birthday dinner, I saved a large cherry tomato clam shell box from ending up spending the rest of its life in the nearest landfill and brought it home so I could re-purpose it.  I had a lot of fun altering this little plastic container and I can't wait to fill it with goodies to send it off in the mail to a special secret Ghoulfriend soon.  

I present to you my altered Halloween themed clam shell fruit box:


I hand stamped all papers.  I used Terrifically Tacky Tape to attach papers and ribbon to the plastic box to insure that it would stay in place.  I used foam Pop Dots on the "Happy Halloween" sign to give it some dimension.  

P.S.  Please be sure to check out Kerry's blog above for a great video tutorial on how to make your very own altered container.

Tuesday, September 07, 2010

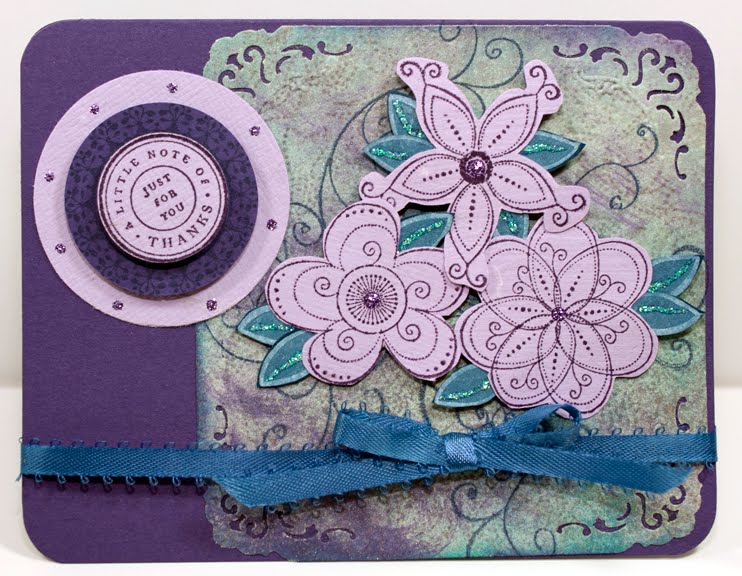
A Thank You Card for Someone Special

I am really enjoying my time spent in my craft room recently.  Yesterday I spent a few hours in there making a Thank You card for a special relative who has been helping me with yard work while I am recovering from my surgery.  This special family member LOVES the color purple, so I hope that she will enjoy her special card when she receives it.


If she is reading this, she knows who she is.  I say publicly to her that I cannot thank you enough for helping to make my yard beautiful.  My illness has left me extremely tired for months and I have not had the energy or gumption to get out in my yard and keep it up the way I normally have in the past.  Greg commutes and works long hours.  He is so tired when he comes home after that long drive that he also has not had the energy to keep the yard up as we have done in the past.  Sometimes the lawn has gotten a bit too long, and/or the bushes have gone without trimming for too long, and I feel embarrassed that my yard is not pristine and beautiful.  I really appreciate your willingness to come to our home and help us out during this time.  Thank you for giving me a yard I can feel proud to call mine and one that I don't worry the neighbor's are talking about.  I love you!

Sunday, September 05, 2010

Sunday Stampin' - Thank You Card - Using Emerging Color Technique

Below is a Thank You card I made today using the Emerging Color Technique found at www.splitcoaststampers.com.  I love visiting Splitcoaststampers for their great ideas, techniques and galleries.  I always find wonderful inspiration there.

I first learned of this Emerging Color Technique from a fellow online stamper and scrapper, Joanie, who is a member of the scrapbooking board that I visit and post on regularly.  Joanie's cards are awesome and I always gain so much inspiration from her work.  To see some of Joanie's cards visit her blog, Joan's Daily Stampede.


This technique was super easy, although I do have to admit that I need to perfect my technique just a bit.  First I need to buy myself a brayer so I can bray on the color (I just dabbed my ink pad on to the paper), second I need to perfect my embossing.  I don't think I inked my large flower stamp enough, so when I put the embossing powder down it didn't cover the image all the way and I was left with some splotches after I wiped the top layer of ink off my embossed image.  Luckily, I was able to cover my mistakes with my top "Thank You" element.

Thanks for looking!

P.S.  I would love to here your feedback.

Saturday, September 04, 2010

How I Spent My First Day Alone Since My Surgery

Today was the first day I have been home alone since I had my Thyroid surgery on August 25th.  Greg went back to work yesterday after staying home with me for a week.  My mom has been coming over every day for the past few days helping me clean/organize my house.  She was here yesterday while Greg was back at his first day of work, as was my Aunt who helped us by mowing our lawn, working in our yard, and feeding me lunch.  Aunt Rene loves yard work, so I think she enjoyed herself, and I know I REALLY appreciate her help with the yard.  It looks fabulous.  

As much as I love and appreciate my family's help I decided I was doing well enough to take care of my basic needs and that I needed a quiet day to myself today.  I think my mom deserved a break today too.  She has been working so hard in my home making it look fabulous and doing things I haven't had the energy to do for a very long time.

It was a nice day today and I've felt pretty good for the most part.  Since my surgery I have had a lot of uncomfortable swelling in my neck.  It often feels like I have a softball lodged in my throat, and it is worse if I lay down because of the pressure of the swelling laying on my throat as I breath, so since I have been home from the hospital I have only had one night where I felt good enough to sleep in my own bed.  Last night I had a lot of swelling again and spent the time sleeping in my faithful recliner.  By this morning I was feeling a lot better, my swelling had gone down quite a bit, so when Greg left for work I went to lay down in bed to see if I could get some rest.  I was able to lay down and sleep and it felt so good to get some rest in my own bed.  I think that is the best sleep I have received since my surgery.

I woke up today not sure of exactly what I was going to do.  I did surf the net for a bit, and then I skimmed the television, but nothing on TV caught my eye, so I decided it was the perfect day to just relax and spend time in my craft room.  I had a fun few hours in there just being creative and making a card with a new stamp that I purchased at JoAnn earlier this week.

Here are the results of my afternoon in my craft room:

Fabulous Friend card for a fabulous friend of mine.

I'm planning on sending this card to a great friend and fellow card maker who came to visit me in the hospital and brought me a special get-well gift.  I hope she will enjoy the card as much as I enjoyed making it.

I'm really enjoying my time crafting here lately.  It's relaxing and refreshing.  Perhaps I will spend some time in there again tomorrow too. I will have to see how I feel.  :-)

For those who are interested here is a list of the supplies and tools I used to make the above card:
  • Misc. cardstock
  • SU Blender Pens
  • SU Water Color Wonder Crayons
  • SU Smooch Spritz in Vanilla Shimmer
  • Organza Ribbon
  • Pop Dots
  • SU "Oval All" stamp set "Fabulous Friend" stamp
  • Inkadinkado stamp (the nest image)
  • SU Scallop Edge Punch
  • SU Small Oval Punch
  • SU Scallop Oval Punch
  • Fiskars 3-in-1 Corner Embossing Punch - Swan Lake (I got this on clearance at JoAnn this week for $3.95. Awesome deal!)
  • Chalk Ink (to ink the edge of the main front stamped image)


Sunday, August 22, 2010

Sunday Stampin' - I spent a little time in my craft room today

I have a wonderful craft room set up in my home.  It is filled with just about every kind of tool, paper and embellishment imaginable to allow me at a moments notice to sit down and scrap, craft, or make a card.  The trouble is that I do not take the time to go in my craft room to enjoy that room and explore my creative side often enough.  

I always find myself doing other things, be it household chores, or spending too much time on the computer, or just plain finding excuses that I don't have the time to go in there and craft.  Lately, one of my excuses has been that my craft room desk was a bit of a cluttered mess from working on a few projects or bringing home projects from my card making group and placing them on my desk, then not putting things back where they belong.

As some of you know, I recently found out that I have thyroid cancer.  While the end outcome of my diagnosis should be positive and leave me thyroid cancer free (I go for surgery this week), finding out at 36 years of age that I have cancer really has made me reevaluate many aspects of my life and how I choose to live it.  One of those areas is putting myself first and participating in activities I enjoy more often.

Because of that I have decided that I need to make some personal enrichment changes in my life and spend more time using all of my tools and supplies that I have spent so much money purchasing.  I need to stop at least one day each week and just enjoy time doing something I absolutely love without feeling guilty that I should be doing something else.

SU Countryside Stamp Set
I decided that today would be a great day to get started on my new personal enrichment goal.  What better time to get my craft room organized and ready to easily use than right before my surgery?  I figure that as I'm recovering I will probably start to feel well enough that I will want to do more than just lay around or sleep, but I might not be up to full speed right away.  What a perfect time this upcoming recovery will be for me to get in there and spend some time being creative.

So, I spent the afternoon cleaning and organizing my craft desk.  I even finished cleaning in time to spend a few hours making a card using my new Stampin' Up stamp set, Countryside.  Here are some before and after pictures of my clean up job, as well the card I made today.  I absolutely love the way it turned out.  I think this new stamp set is definitely going to be on of my favorites.

My craft room before the cleanup today.  With my helpers Bella and Gigi doing a pre-cleanup inspection.

My craft room after the cleanup today.  It looks so much better and it is so nice to have everything reorganized and my desk clear so I can just go in my room and create.

The card I made today using my new set of SU Countryside stamps, and an older SU Stitched background stamp.

Tuesday, May 05, 2009

I've Been Making Cards Recently

I know my blog has been pretty stale for several months now. I just haven't been inspired to post anything until recently. I have had the creative bug bite me hard again recently and I've been very inspired to start spending more time being creative and to share some of my recent paper crafting projects here on my blog.

Hopefully this will be the start of a revitalization of sorts for both me personally and for my blog.


This creative bug bite came at a perfect time as I was also recently asked to join a small group of women for a monthly card making club. Until recently I didn't realize that one of my new friends that I play Bunko with each month, JoNell, is a Stampin' Up Consultant. Last month she had me over to her home for a card making workshop where we had some great one on one time visiting and making cards. While I was there JoNell asked me to join the card making group she and a few other friends were starting. We had our first get-together last week. There are just 5 of us, but I can already tell we are going to have so much fun together. This really is a wonderful group of women and I’m so excited to be a part of this group.


Each month we are going to have a theme. Each of us has to come up with one card that fits that theme. We then put together a kit for each other member that contains the cardstock and supplies needed and we teach the other 4 girls how to make our card. In the end we each go home with a total of 5 different cards (one of our own and 4 others).


Our April theme was Sympathy. Some of us came up with ideas on our own, other's CASED ideas found online at sites such as http://www.splitcoaststampers.com/ or CASED ideas of cards found in gift stores. Below are photos of the cards I made and brought home.


This is the card I designed and had each girl make


The card Desiree designed and had each of us make

The card Desiree's Step-mom (her name is slipping my memory ) designed and had us make. This is my favorite card we made that night. She was so worried about teaching us all how to make it and we all thought it was wonderful and so creative. The lacy part on the bottom is a round paper doily cut to fit. The photo doesn't do this card justice.


The card Aletha designed and had each of us make.


The card JoNell designed and had each of us make.


This month our theme is masculine, either something appropriate for Father's Day or a masculine birthday. I already have all kinds of ideas running around in my head for this months theme. I was even dreaming about card designs last night. How bad is that? LOL
We meet again on the 26th of this month so I plan to post soon after.
I also hope to wake this blog up by posting some of my other recent paper crafting projects on here in the coming days. I would love to here your opinions and feedback. That is what helps me become a better designer.
Stay tuned.

Thursday, December 04, 2008

Dec. 4, 2008 - December Joy Challenge Day 2

Tonight I found joy in finishing up a craft project I've been working on for my ScrapShare Secret Santa. How appropriate for this challenge, it just happens to be a Christmas themed "J-O-Y" altered letter wall hanging.

I love crafting, but it is not something I allow myself to do very often. I always look around my house and see all the everyday tasks that I am behind in and I usually end up talking myself out of getting involved in a craft project because there are more important tasks that need my attention and I know that crafting can become time consuming.

This type of thinking is something I've recently tried to change. Now that I have my own scrap & craft room set up, I have been trying more often to just allow myself "me time" and the opportunity to go in that room a little each week and work on projects that are fun. I know that being creative is something important in my life that I need to do for myself and my sanity. I love that I am able to give myself my needed me time more often now without feeling like I'm making bigger messes in my house now that I have my scrap & craft room. I finally have all of my craft and scrap supplies neatly organized and available in one spot in the house. I've been dreaming of that for years.

It took having new carpet installed in my house in July and having to completely move out all furniture and belongings that were touching carpet out of our house to get me motivated to turn my spare bedroom (formally our disaster of a storage area) into my scrap & craft room.

Now I can easily find all of my craft supplies in one quick glance. I didn't actually work on my altered "Joy" project in my scrap & craft room tonight, because I had it out in my dining room from working on it last week while my niece was crafting with me, however it was so nice to be sitting there working on my project and whenever I needed an item I could just run into my scrap room and find it right away without having to dig through disorganized bags or piles of stuff. It was so nice after I was finished tonight to be able to grab my supplies and walk in to that room knowing that had an organized place to put away each one of the items.

I love that I can walk down my hall and look in that room now with pride in the way it looks and be proud to realize that it is also functional now, rather than being a useless waste of space it once was filled with disorganized possessions and yard sale junk.
I find so much joy in having my own little space in the house that is all mine where I can go be creative as I make things for both myself and for others.

Thursday, March 08, 2007

I've Found a New Paper Crafting Passion

Thanks once again to www.ScrapShare.com and to all of the wonderful ladies on that site who share their creative works and ideas I have recently found a new creative outlet that I'm becoming very excited and passionate about. It's called Altering or Altered Art. So far I have only altered a couple of different items, but I've been so excited to see how these items have turned out that I now have several items just waiting to be altered and given as gifts to my loved ones. I still love scrapbooking and the idea of scrapbooking, but I also love the fact that with altering I don't feel that I am limited in what types of materials I can use because I have to worry about the safety of my photographs and I can buy and use all of the cute lumpy-bumpy items that I find for sell in my local scrapbooking/crafting stores. I feel like with altering it is pretty much an anything goes art form. I am only limited by my mind and artistic abilities.

I thought it would be fun to share some photographs of my very own altered works of art. The photograph below is of an altered glass votive holder that I made as a gift for my ScrapShare Secret Cupid during the board's Valentine's Secret Sister Swap. This was my very first altered item and the first time I had used the product Mod Podge.


I had heard about Mod Podge before, but really didn't know what it was or what it would do until I read more about using Mod Podge on ScrapShare member Cowtown Stacy's scrapbooking blog, (Scra)propos. Stacy is such a creative and talented artist and a wonderful writer. She is a wealth of artistic knowledge, and I love that she is so passionate about sharing her knowledge with the rest of us. Stacy has a wonderful step by step tutorial under the category "Off the page" on her blog that explains in detail how to alter wooden letters.

After reading her tutorial, I thought, "I have to buy some Mod Podge and try altering some letters." As you can see above I didn't quite make it that far. I did go to my local Michael's Craft Store to buy a bottle of Mod Podge and while I was in the store that day I was also shopping for items for my Secret Valentine. Well, I found the perfect Cherry Blossom scented votive candle. I put it in my shopping cart and thought I really need to find a nice candle holder for this candle. So I continued to shop looking for a candle glass. I found a row of plain 'ol glass votive holders and thought, "boring!" Then I looked across the aisle and right there staring me in the face was the selection of Mod Podge. That is when the light bulb went off in my head and my creative juices started flowing. I thought, "Hmm, I wonder if that stuff will work on glass?" Sure enough, it said it would. So in my cart went the bottle of Mod Podge, two plain glass votive holder (in case I messed one up) and I was off to find embellishments.

I came home that evening so excited to start working on my new project. I pulled out all of my materials I had purchased to create the votive holder and went to town. I was so surprised at how easy it was to work with the Mod Podge and how quickly it dried (20-30 minutes) so that I could go on and finish my project.

If something takes a long time to dry or I have to wait for more than a few hours to finish a project then I loose interest. That is why I could never be a successful painter or clay sculptor. I couldn't stand the wait for the paint to dry or the clay to be fired.

The votive holder project from start to finish probably took me 2 1/2 hours. A good half hour of which was probably spent with me trying to figure out exactly what paper pattern I wanted to use and how I wanted to embellish my work of art. I was so excited and please with how easy it was to put together and how well it turned out.

The photos below are of my second altered project, an altered paint bucket. I am going to be using it as the container for a bridal shower gift I am putting together for a cousin who is getting married soon. I thought it would be fun to put together a "Newlywed Survival Kit" filled with a variety of romantic things that she and her soon-to-be husband can use after they are married. I have seen the altered buckets online before and I love them. I like anything that is different and stands out in a crowd. I figured that this gift might be something that she would keep in her bedroom, so I casually asked what her home colors are going to be and set out to create a gift that would match and compliment the colors of her bedroom.

My projects kind of become like babies to me. I become very attached to my creative work, and as sad as I will be to see my first altered paint bucket go to a new home, I cannot wait to fill it with all kinds of goodies and give it to my cousin at her bridal shower this next week.